Styles
We would like to emphasize the importance of .docx styles. They are a way for the platform to recognize whether you intend a body of text to be a heading or a paragraph. For a human, it may seem like an easy task in distinguishing a paragraph from a quotation or a chapter title from a section header, but that’s because a typical human has seen lots and lots of text and developed an intuition in this regard. For instructions run by a computer, this task is not so simple.
This is why you must use .docx styles for the computer to transform your manuscript into a book.
In order to choose a style, first find the “Home” tab at the top of your MS Word window. Secondly, either select a one of the visible styles from the “Styles” box or click the “⊽” button on the right, choose “Apply Styles” and enter the name of a style you need. Figure 2.1 shows you how to do it. In Table 2.1 you can find the most important MS Word styles you can use.
Figure 2.1: How to select a MS Word style.
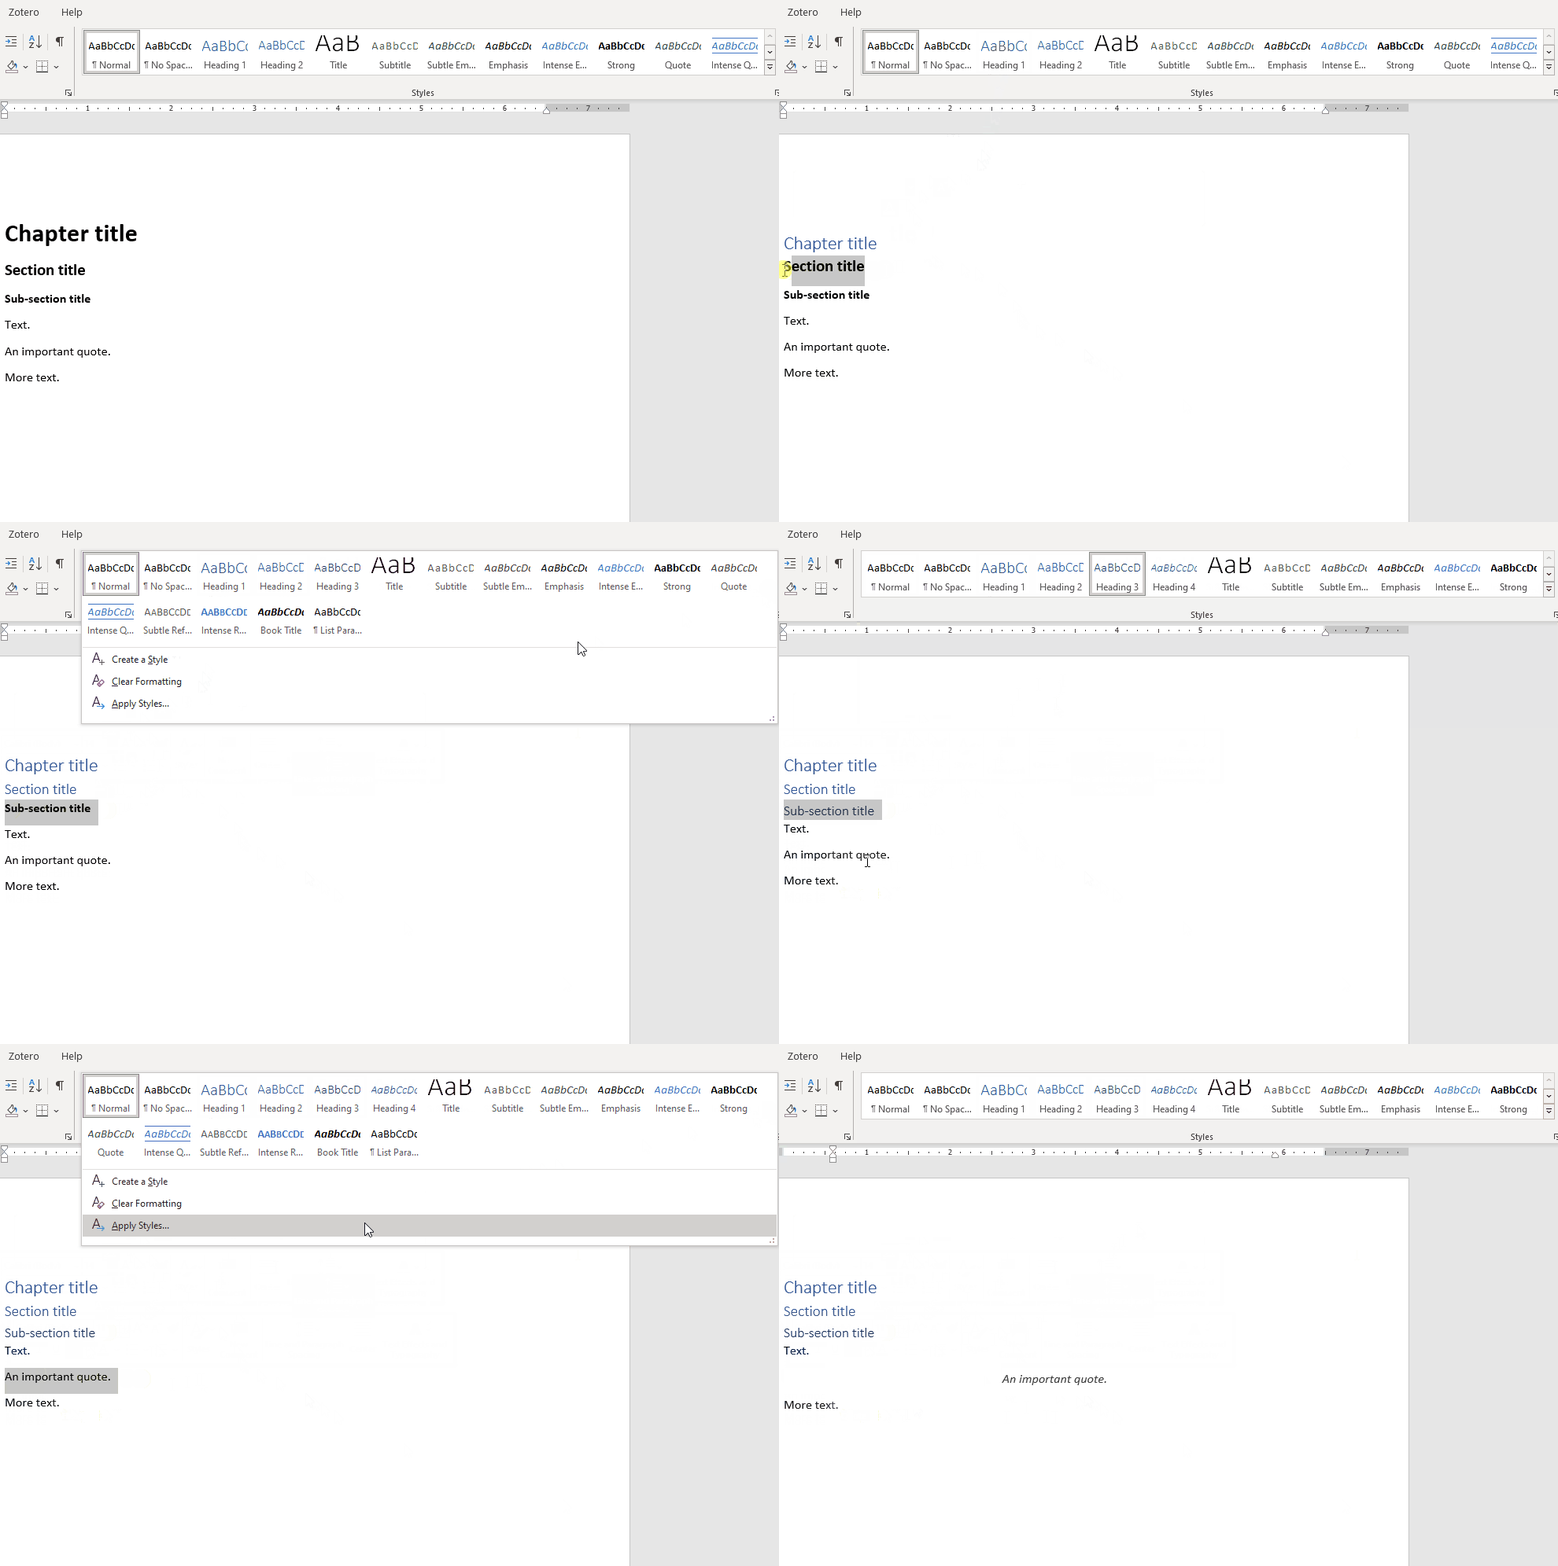
When you choose a MS Word style, selected content will change its appearance in your .docx file. Do not worry about it. MS Word styles will enable the system to correctly structure your work and display it in the final layout.
Table 2.1: MS Word styles that affect the structure of the end result.
| MS Word Style | Part of a book |
|---|---|
| Heading 1 | Heading 1 (e.g. chapter heading) |
| Heading 2 | Heading 2 (e.g. section heading) |
| Heading 3 | Heading 3 (e.g. sub-section heading) |
| Heading 4 | Heading 4 (e.g. heading for dividing sub-sections) |
| Heading 5 | Heading 5 (e.g. heading for parts divided with Heading 4) |
| Quote | Quotes |
| Caption | Captions |
Captions
For every table, figure and equation in your manuscript you have to insert a caption in MS Word. Do not worry about caption numbering – this will be synchronized with other parts of the book you are working on.
To add a caption, simply open the “References” tab and select the “Insert Caption” button at the top of your MS Word window.
Figure 2.2: How to insert a caption.
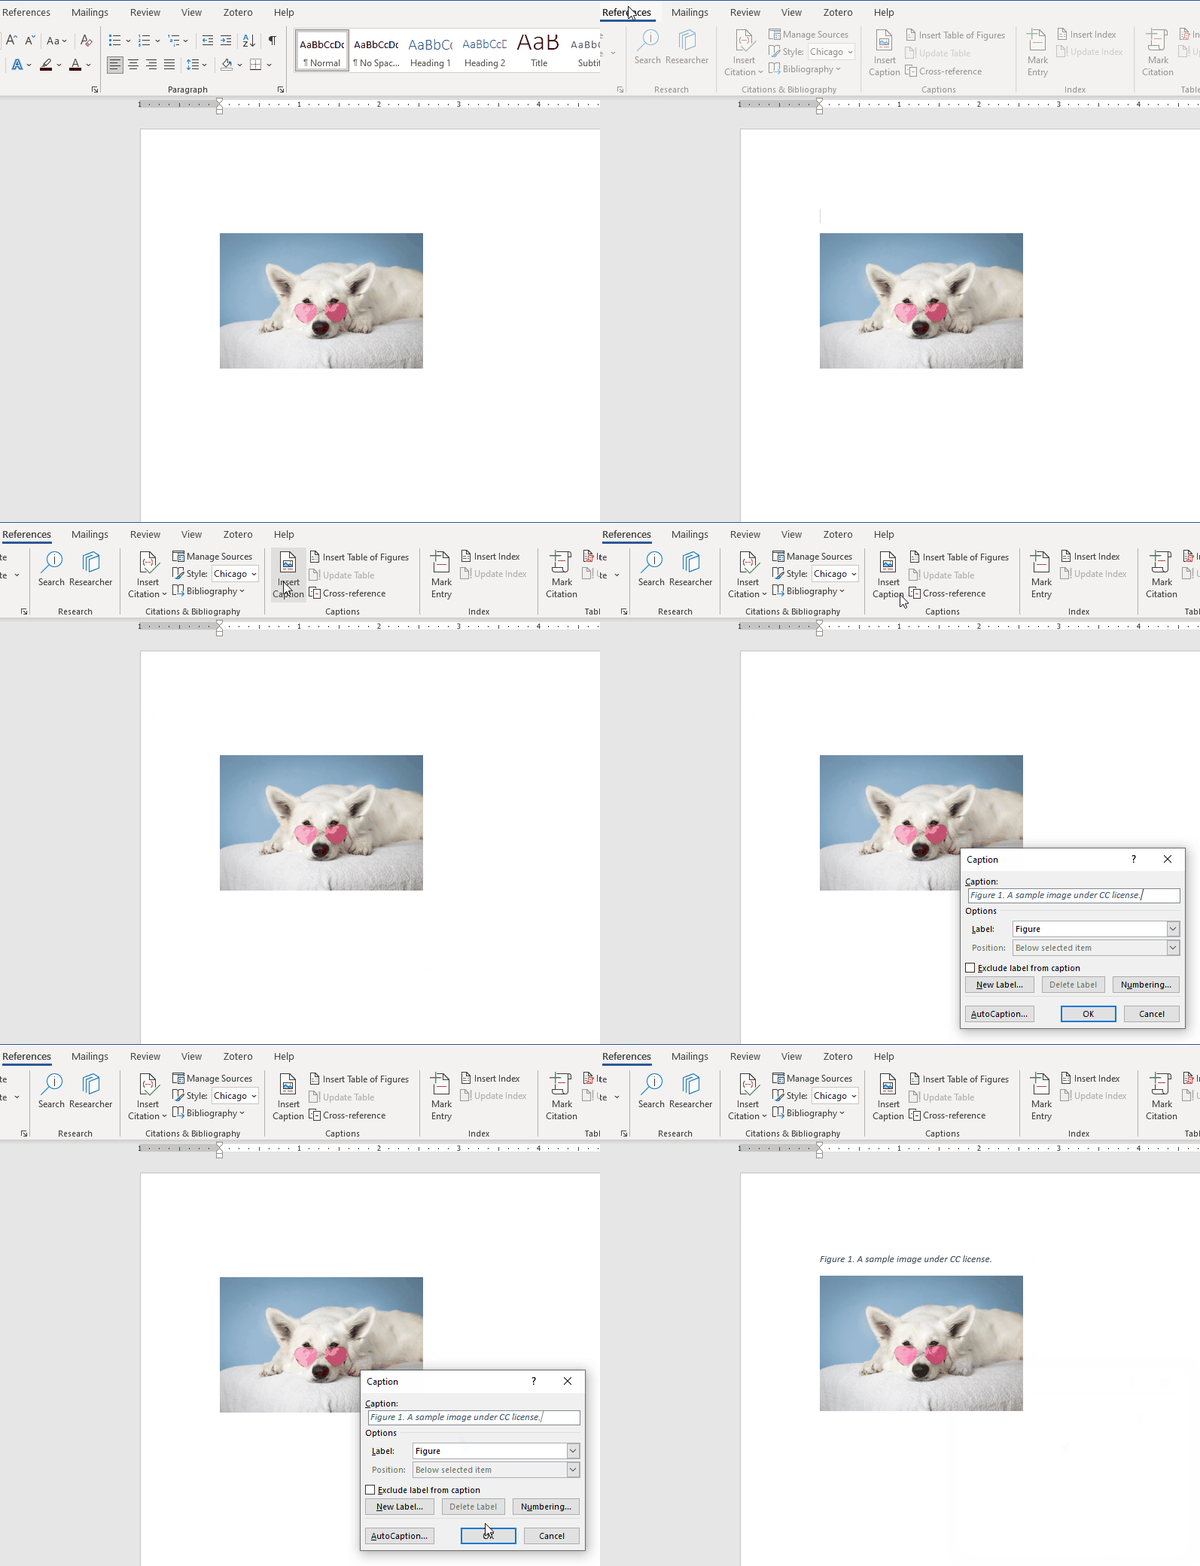
A “Caption” window should appear. Select the “Label” to choose which type of resource you are referencing. For advanced settings of caption numbering, click the “Numbering…” button.
Figure 2.3: Caption window in MS Word.
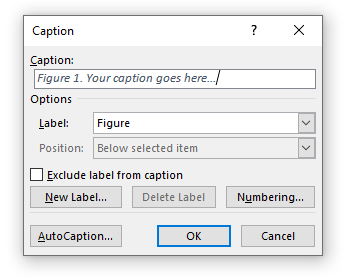
Note that each caption autoincrements automatically. To update a caption manually, right-click on the numbering item (e.g. on “1” in “Table 1: Some title”) and select “Update field”.
How To Structure Image Captions?
Please add a title to all tables and figures which includes source or copyright information as part of the caption (not in a footnote). E.g. “Figure 1: descriptive title, source/photographer/copyright note”.
Rule no. 1: Follow the format given by the copyright holder
Some copyright holders will ask you to cite their work in a specific format. Please do so even if it doesn’t follow the example formats shown below.
Example structures for image captions
Basic structure:
[descriptive title / title of the artwork] [all relevant source and copyright information].
Example structures:
[Name of artwork or monument] [ year, photographer, agency].
[Title of the panting, original artist, year] [Museum, photographer].
[Title or description of archival record] [archive, record number].
[Description of the image’s content] [photographer, weblink with access date].
[Name or description] [name of artist/photographer/originator, link to the original file, CC-license with version number, link to the license]. [for CC licenses, you can use: https://
lizenzhinweisgenerator .de / ?lang =en]
“Courtesy”, “©”, or “with friendly permission” may be added, but doesn’t need to be included.
Metadata Tables
Reason Behind Metadata Tables
When publishing a book, it is important to consider not only the contents of a book, but also data concerning objects included in a book. For example, authors need to properly assign all relevant copyright data about an image in order to properly document rights to publish it without infringement. This encompasses data about who the author of the image is, what license it was published under, etc. To describe all the metadata related to a figure or other object, you have to use Metadata Tables.
Example Of A Metadata Table
The platform for digital publishing uses Metadata Tables to collect, validate and manage additional information about your book’s assets, like images, videos, etc. A Metadata Table looks like this:

Figure 2.4: Example of an image with Metadata Table. Photography was taken by Jean Carlo Emer and is licensed under the Unsplash License.
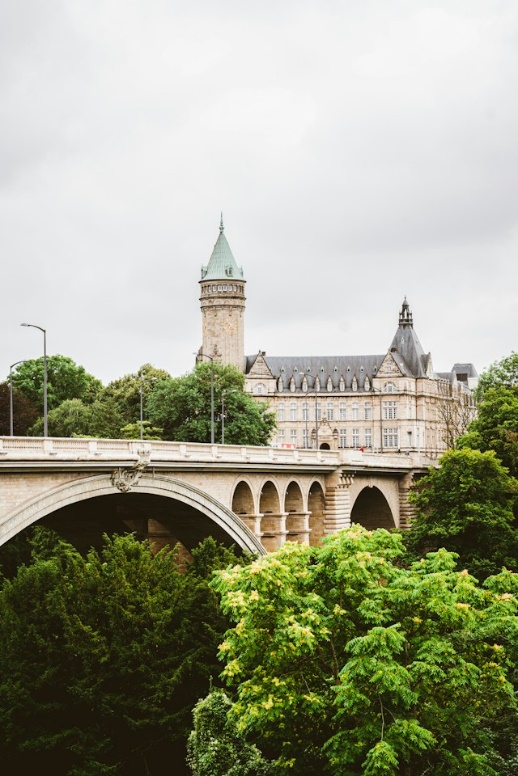
Metadata Tables will not be shown in a paper nor in a digital version of your book, but it will be analyzed by the computer system that generates both.
Note that a Metadata Table is just a standard MS Word table with 2 columns: the field name and the field value.
Field Names
The field name must consist of ## characters and the name of the field chosen among the following supported field names:
Supported Fields
Table 2.2: Definitions of fields in Metadata Tables.
An error in a field name, even a small typo, will make the Metadata Table row unreadable by the system. For example, ##License is a valid field name while #License or ##Name-of-a-license are not and will not work.
Input Fields
“##Digital-input” and “##Paper-input” fields are important because they allow us to do certain operations on images and other assets that you want to include for your publication. Please make sure that you include all such assets in the “assets” folder and write a valid relative location to those files.
If your book’s folder has the following structure:
slug-of-my-book

├── 01_chapter_one.docx

├── 02_chapter_two.docx

└── assets/

 └── chapter_1/

 ├── filename.tiff
Then, in a Metadata Table in “01_chapter_one.docx” chapter a ##Digital-input or ##Paper-input field could be equal to ./assets/chapter_1/filename.tiff. Note that your book’s folder is the point of reference here (name your book’s folder like “slug-of-my-book” is the ., other directories in which this folder is located does not matter).
Source Field
“##Source” field is essential for monitoring and managing attributions and copyright information.
In the “##Source” field you must add a credit line for your asset (image/video etc.), which contains all relevant copyright information such as the source (museum/archival record/film/website etc.) and/or copyright holder (originator/artist/photographer/institution etc.). Please refer to the terms of usage specified by the institution, from which you have obtained the material, and follow their rules on how to credit their material. For own creations please write “photo/graph by the author” (or insert your name). For assets published online under a CC license, use lizenzhinweisgenerator
References
References To Websites
The simplest form of a reference is a hyperlink to an external website.
You can add a link to any website you want. To insert a hyperlink, press the Ctrl + K shortcut on your keyboard (alternatively, go to “Insert” on the top bar in MS Word > “Link” > “Insert Link…”). Enter an address you want to link to and optionally a text to display.
Figure 2.5: Inserting a hyperlink in MS Word.
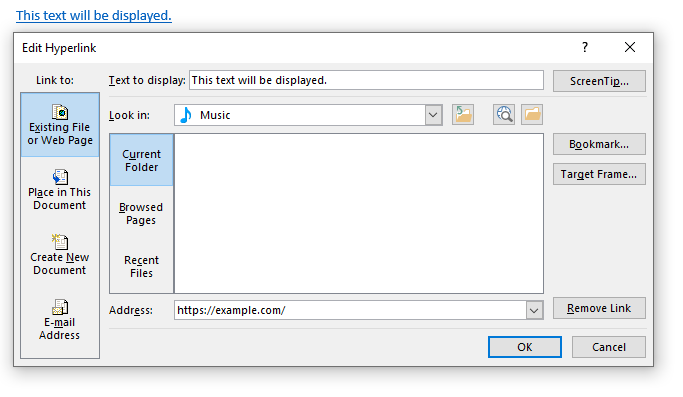
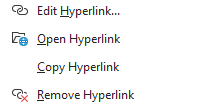
Figure 2.6: To open the window to edit the hyperlink, right-click on it and select the “Edit Hyperlink…” button.
References Within A File
To enable a navigation to a different part of the same file, you have to cross-reference it. For tables, figures and equations, you must insert a caption manually before you can cross-reference them, while for headings a caption is not needed. As an example, you can navigate to “Captions” to read about how to insert a caption and to “Figure 2.8” to see how to cross-reference other part of the same file.
Cross-Referencing Objects
To cross-reference an object within the Word file, go to the “References” tab at the top of the MS Word tab and click the “Cross-reference” button.
Figure 2.7: How to insert a cross-reference.
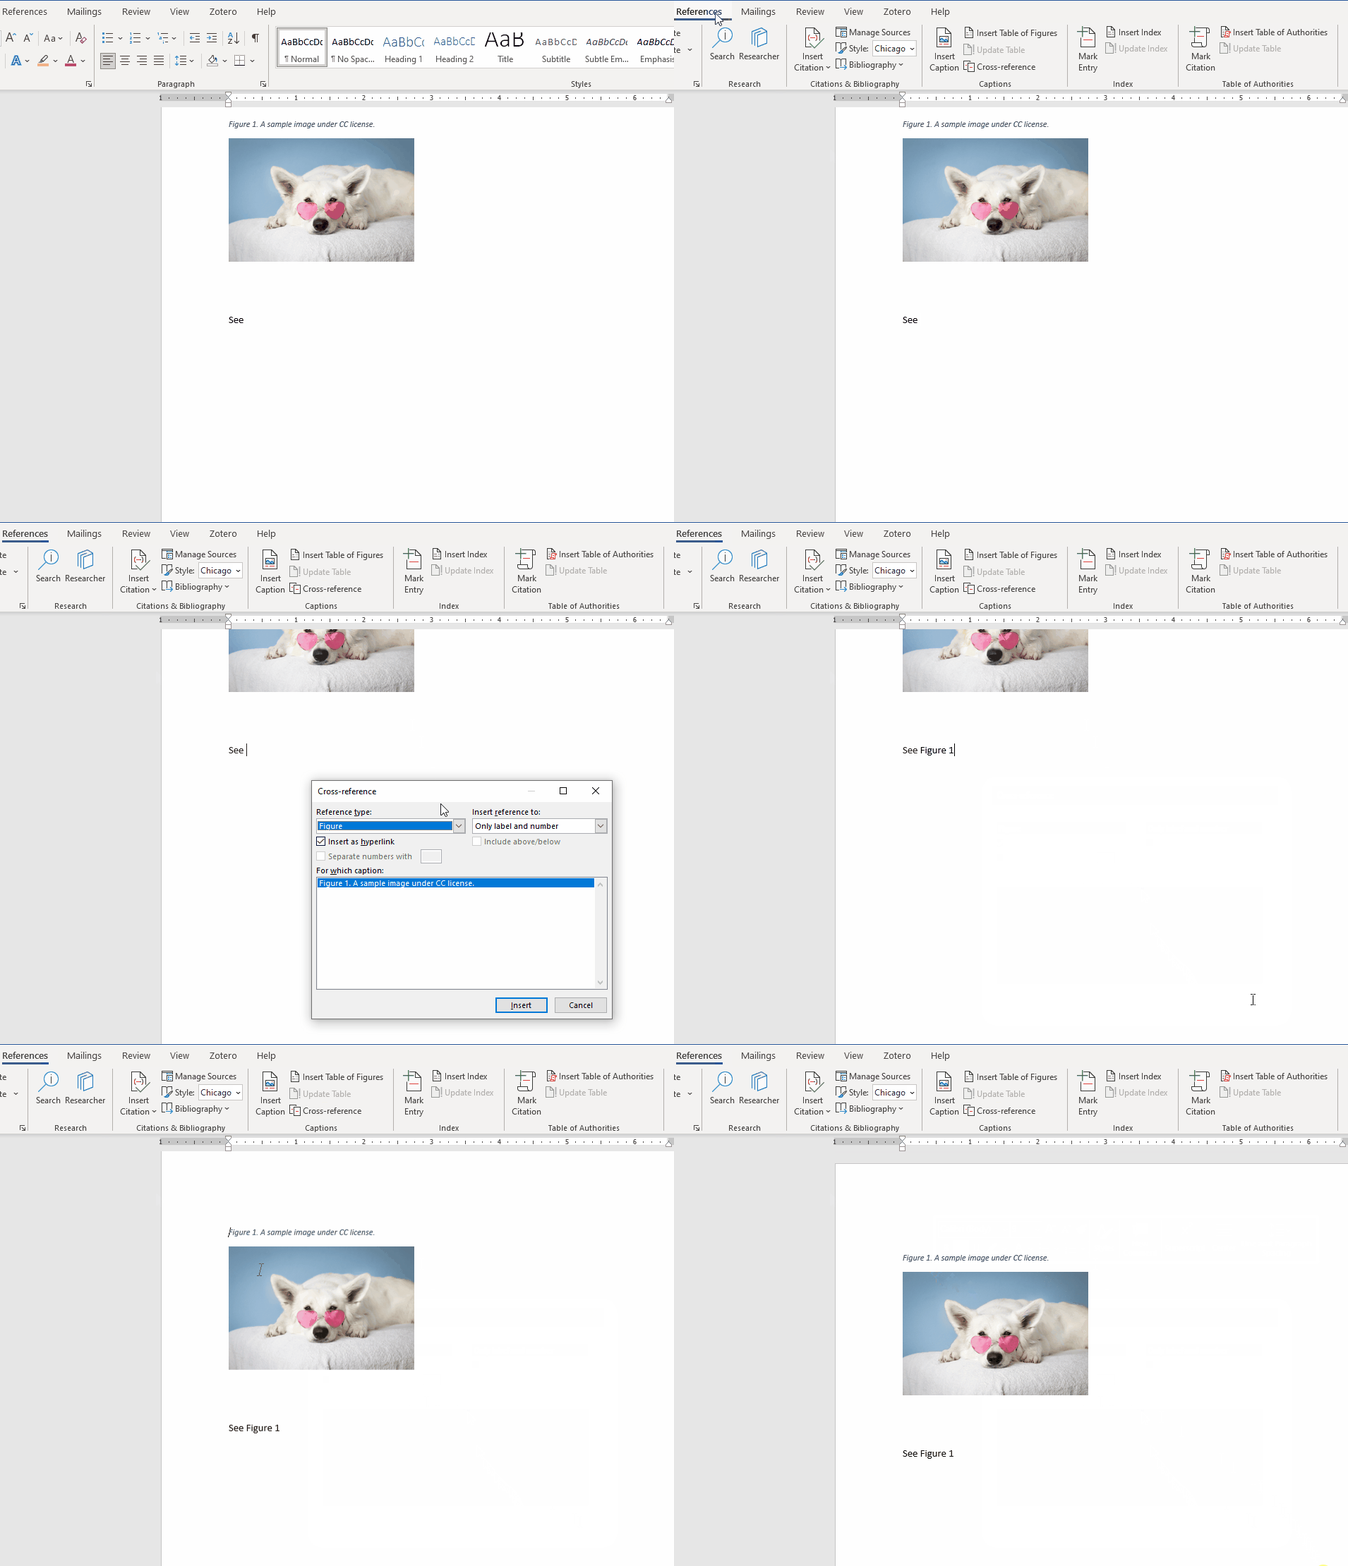
Choose the type of reference (e.g. header, table, figure, etc.) and select which caption you want to reference to. We recommend that you always insert a hyperlink in your cross-references.
Figure 2.8: Cross-reference window.
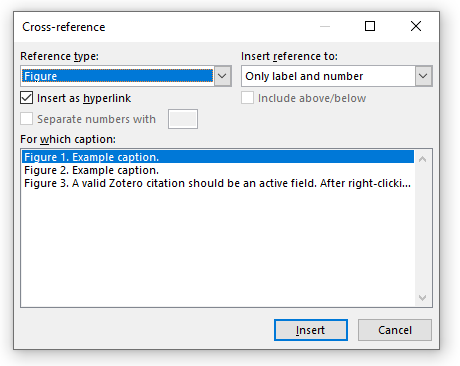
The “Insert reference to:” button allows you to set how the reference will appear in your work (e.g. “heading number” vs “heading text”). With tables, figures and equations you should insert reference to “Only label and number”, e.g. “see Figure 2.1“. In particular, please do not reference page numbers, as this number will change when transforming your book from MS Word to the printed and the digital version.
You can also cross-reference heading. To do that, there is no need to insert a caption, just click on the “Cross-reference” button, choose the “Heading” reference type and select the object to reference to.
References Between Files
You can also create navigable references to different chapters in your book by inserting a link to a bookmark in another file. First, you have to add a bookmark in .docx file. Secondly, you insert a link to that bookmark.
Adding A Bookmark
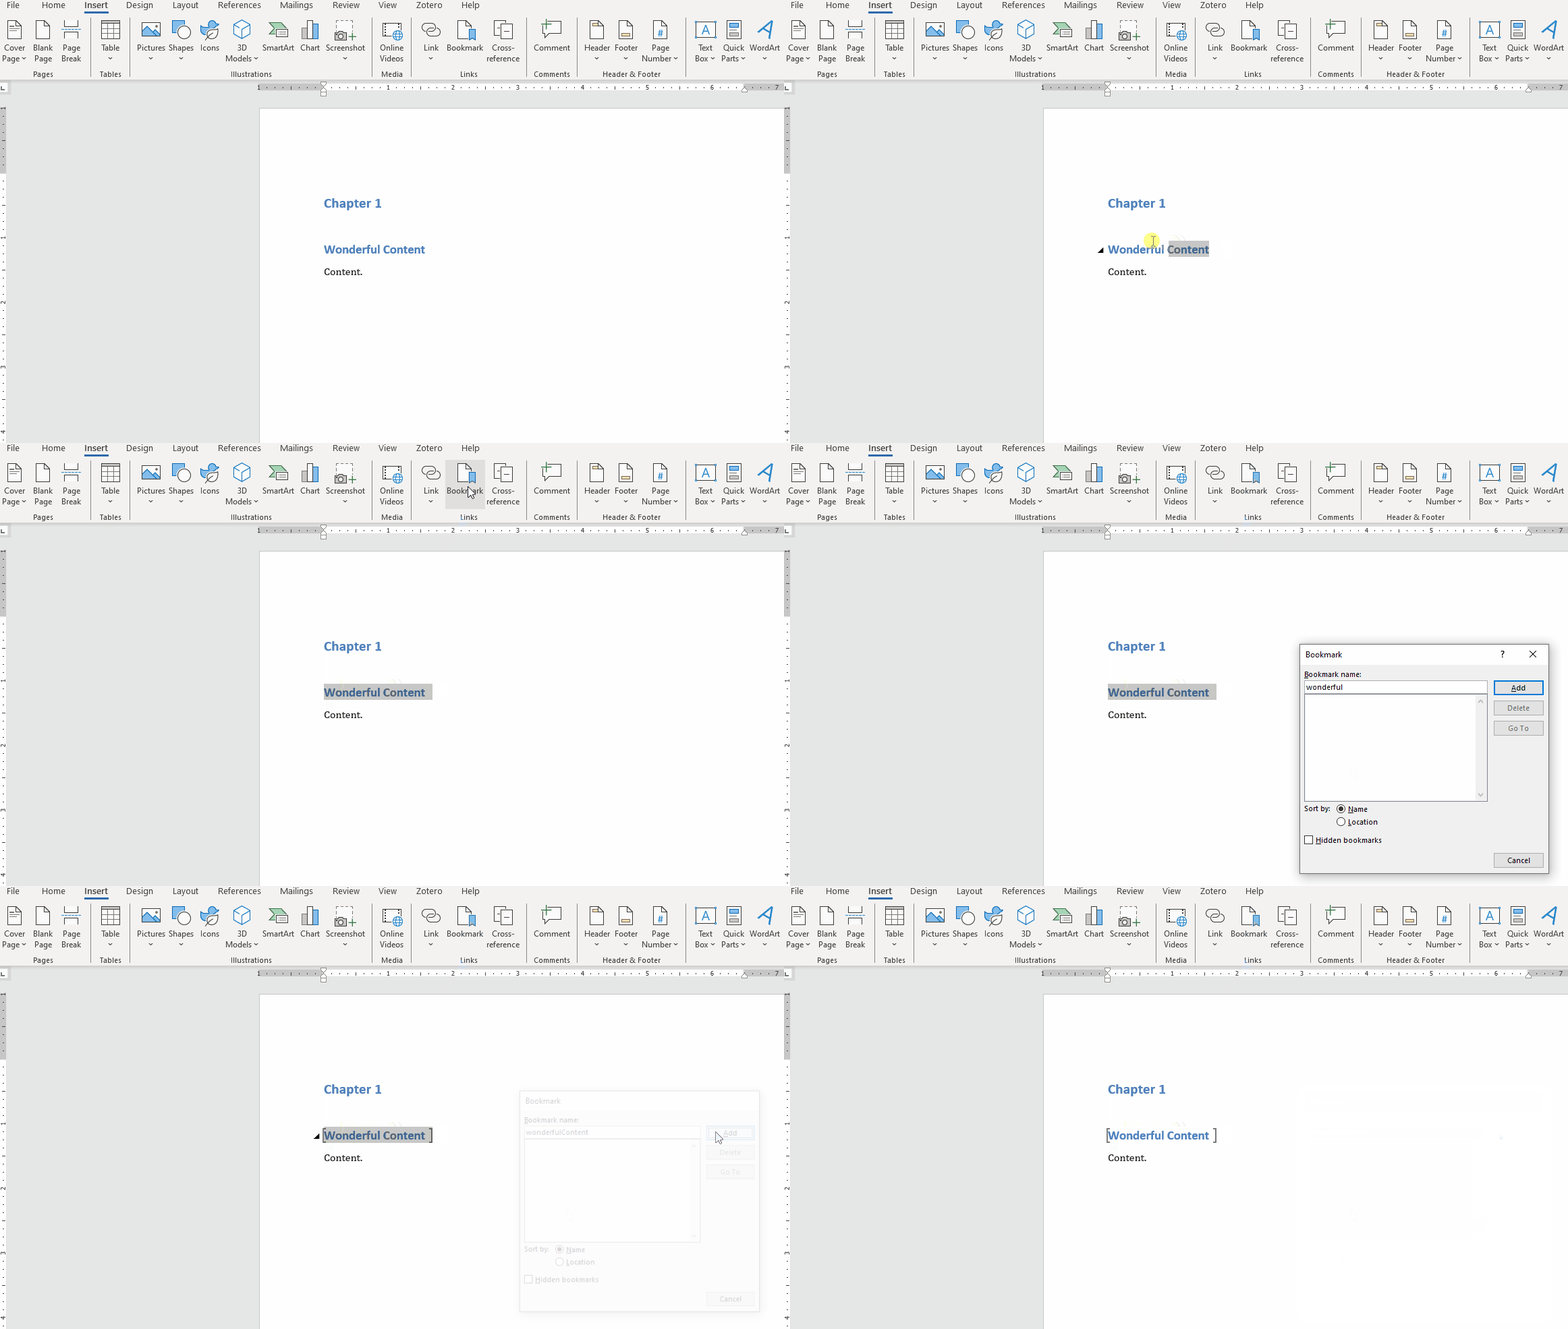
To cross-reference an object within the .docx file, go to the “Insert” tab at the top of the MS Word tab and click the “Bookmark” button. Then, type the name of your bookmark, remembering that no spaces and no special characters are allowed. Click “Add” to insert the bookmark.
Figure 2.9: How to add a bookmark.
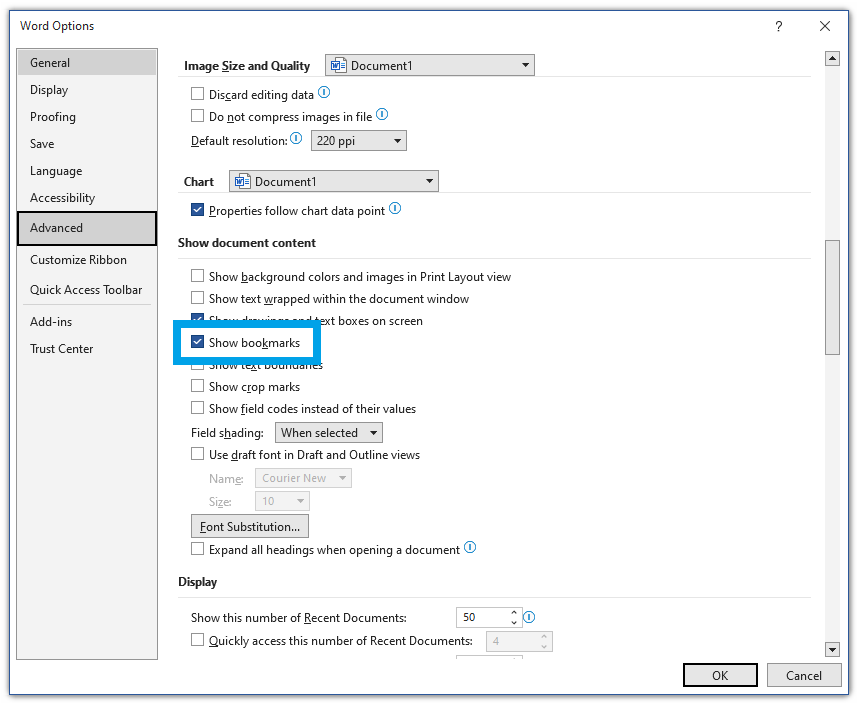
Bookmarks are hidden by default. Managing bookmarks can be made easier by changing MS options to show them while editing .docx files. To do that, click on “File” tab on the top left corner of MS Word and select “Options” at the bottom left. In the Word Options window, select “Advanced” and turn on the “Show bookmarks” checkbox.
Figure 2.10: Enabling bookmarks to be shown in MS Word.
Linking To A Bookmark
Inserting a link to a bookmark starts in the same way as inserting a link to an external website, as described in the “References To Websites” chapter. In the “Insert Hyperlink“ window (see Figure 2.5) select the file where the bookmark you want to link to is located and click on the “Bookmark…” button on the right. By clicking it you should see a list of all bookmarks in that file. Select one, click “OK” and change the “Text to display” accordingly. Click “OK” to close the window.
Here is an implementation example: see this link to a chapter about digital-specific elements of a manuscript, which in reality is a link to a bookmark in that file.
If you want the number of the figure or table to be shown, you can do that. While in the “Insert Hyperlink“ window (see Figure 2.5), write the text to display replacing the number of referenced figure or table with a placeholder “XXX”. The “XXX” placeholder text will be replaced by the platform with an appropriate number.
Generate Table Of Figures
Another benefit from using cross-references is that you can automatically generate the table of figures or other objects. To do that, navigate to the “References” tab in the top of the MS Word bar and click the “Insert Table of Figures” button.

A window should appear where you can select options for your table of figures. We recommend, however, to always disable showing page numbers. You should also always use hyperlinks instead of page numbers.
Figure 2.11: Table of figures window.
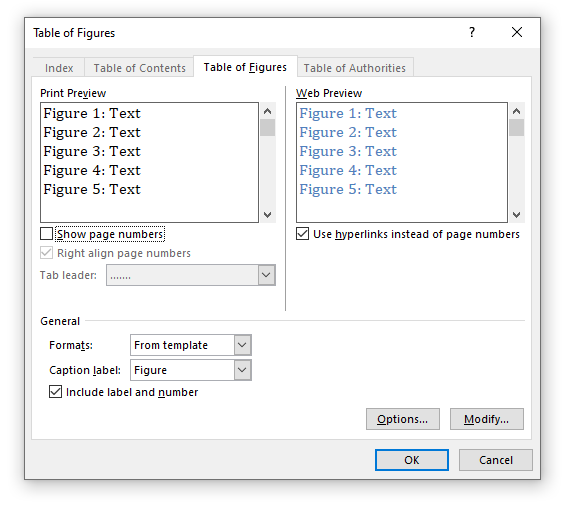
Please see below the exemplary table of figures used in these guidelines. It is worth noting that only figures that have captions can be referenced, which means that only those figures can be referenced by a table of figures.
Exemplary Table Of Figures Used In This Publication
Figure 2.1: How to select a MS Word style.
Figure 2.2: How to insert a caption.
Figure 2.3: Caption window in MS Word.
Figure 2.5: Inserting a hyperlink in MS Word.
Figure 2.7: How to insert a cross-reference.
Figure 2.8: Cross-reference window.
Figure 2.9: How to add a bookmark.
Figure 2.10: Enabling bookmarks to be shown in MS Word.
Figure 2.11: Table of figures window.
Figure 2.12: Inserting a caption directly in MS Word.
Figure 2.13: Zotero plugin installed in MS Word.
Headings
Your manuscript should be subdivided into sections (and, if necessary, subsections). These sections must be labeled with headings. Please do not use capitals. Also, simply bolding a heading will not work as intended.
Headings and contribution titles should be succinct (approximately 80-100 characters) and expressive and should not be concluded with a period. Please avoid an excessive number of sections/subsections if possible. If the manuscript is in English, please write headings in “Sentence Style” (i.e. capitalization of the first word and all proper nouns) or “Headline Style” (i.e. capitalization of all words, except articles and prepositions). The main title of the publication should be set in “Headline Style”. Make sure that headline capitalization is uniform throughout the entire manuscript. Use MS Word styles for headings in your work (e.g. for chapter titles, section headings, subsection heading, etc.):
Example Of Heading 1 (Title)
Example Of Heading 2
Example Of Heading 3
Example Of Heading 4
Example Of Heading 5
Note that there is no heading 6.
Every .docx file should open with “Heading 1” as the title of this part of the book. There shouldn’t be more than one Heading 1 per file.
If you write your whole manuscript in one .docx file, every new chapter (or however you name the primary parts of your book) must start with Heading 1.
Please pay attention to always include at least two sections on the same hierarchy level of headings:
Heading 1
1st Heading 2
2nd Heading 2
1st Heading 3
2nd Heading 3
3rd Heading 2
Please do not add footnotes to headlines; instead place them within or at the end of the paragraph that follows.
Make sure that you increment heading levels sequentially, e.g. heading level 3 is preceded by heading level 2 and not level 1.
Styling Body Of Text
Paragraphs
A block of text not styled with one of the styles included in Table 1 will be by default rendered as a paragraph. We recommend however using the “Body Text” or “Normal” style to avoid unnecessary errors.
Please do not indent paragraphs.
Typography
Currently, we support the following font formatting:
Italics should be used for foreign-language expressions as well as for titles of books, published documents, newspapers, and journals. It may be used to draw attention to key terms in a discussion at first mention only. Thereafter, these terms should be set in roman. However, please keep the use of italics to a minimum. It may also be used to emphasize a word or phrase in a quotation indicating [emphasis mine].
Bolded text should be avoided.
Subscript (e.g. H2O).
Superscript (e.g. 11th of November).
Quotes
When quoting a source, please make sure to faithfully transcribe spelling and punctuation. To add information or paraphrasing for clarity, use square brackets [ ]. To jump over a section of the source material, use ellipses [...].
Short quotes (up to 60 words) should be integrated into the body text with quotation marks.
Longer quotes (more than three lines) should be formatted as block quotes without quotation marks. Please use the “Quote” MS Word style to format a block quotation:
Sometimes you must put a lot of manual work to automate something.[1]
Lists
Bullet Lists
We support non-ordered bullet points…
First point
Second point
Third point
Ordered Lists (Numbering)
…as well as numbered lists.
Multilevel Lists
Multilevel lists are also supported.
Item 1
Item 1.1
Item 1.1.1
Item 1.1.1.1
Item 2
Other Lists
You can also create nested unordered lists by indenting bullet points.
point 1.
point 1.2.
point 1.3.
point 1.4.
point 2.
Multimedia
Images
To include an image in your book, add a caption as described in the section about captions (e.g. “Figure 1: Description of the image, credit to the image’s source.”) and insert it as a picture below the caption. Remember to fill out a Metadata Table right below the image (see details in the Metadata Tables section) and provide an “Alt Text” to characterize the image.
For every image you wish to include in your book, you are required to provide it a high resolution (300 DPI and above). The figure to be included in the paper version and the digital version can be different – just make sure both versions are stored in the “assets” directory and Metadata Table contains correct path to files in the assets folder. Images to be printed as part of the paper book must be numbered and named according to their figure caption inside the manuscript (e.g. “Figure 1” or “Chapter01_Fig01”).
Videos
The rules regarding images applies to other figures such as videos (remember to include a caption, file in the assets directory and Metadata Table with appropriate information). In addition, take care about accessibility: videos should be accessible for a wide range of audiences, including people with visual or hearing impairments. For this purpose, we highly encourage adding transcriptions to videos included in the manuscript.
Alt Text
Please provide an “Alt Text” to describe appearance or function of multimedia object (images and videos) you include in your manuscript. The alt attribute is used to increase accessibility and user friendliness, including for blind internet users who rely on special software for web browsing.
To add an “Alt Text” please use the “##Alt-text” field in a Metadata Table under each described object.
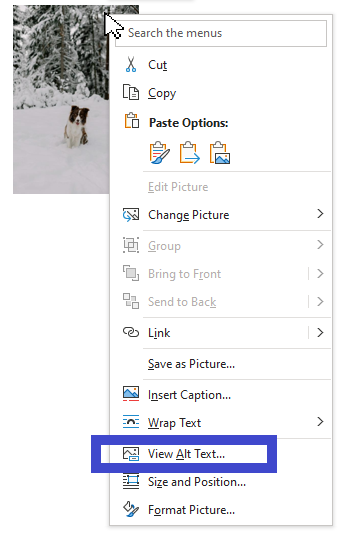
Alternatively, you can add “Alt Text” by right clicking on an inserted multimedia and selecting “View Alt Text…”. This solution enables you to use MS Word feature of automatically generating alt text for you.
Figure 2.12: Inserting a caption directly in MS Word.
Tables
There are no explicit rules for formatting a table. If you insert a proper MS Word table, the platform should be able to recognize it and its contents and render it.
Table 2.3: The first example of a table.
| Header 1 | Header 2 |
|---|---|
| Row 1, Column 1 | Row 1, Column 2 |
| Row 2, Column 1 | Row 2, Column 2 |
Note that the styling of a table does not influence how the platform will render it. The general rules of styling are applied, though (see for example the bolded table headers). Please refrain from using unnecessary highlights (italics, bold).
Table 2.4: The second example of a table.
| Header 1 | Header 2 |
|---|---|
| Row 1, Column 1 | Row 1, Column 2 |
| Row 2, Column 1 | Row 2, Column 2 |
All tables other than Metadata Tables need to be numbered and accompanied by a table heading or caption, e.g. Table 1: Examples of formatting a table.
Footnotes
Footnote numbering should be continuous in the manuscript. If desired, the numbering can start over at the beginning of each new chapter. We recommend resetting the footnote numbering for each new chapter.
Please avoid using footnotes in headings and titles.
The platform supports footnotes out of the box. Just insert a footnote[2] and the software will handle it further. To insert a footnote in MS Word, you may click the “Insert Footnote” button or use the “Alt + Ctrl + F” key combination.
Citations
You can write your citations by hand or use the Zotero citation manager. Not using a citation manager makes it simpler for the editorial and typesetting processed and is sometimes required by the publisher. Check with guidelines of your publisher if a citation manager is allowed or not.
Note however that you as an author are responsible for all mistakes that might appear in the print as a result of not using a citation manager. For this reason some authors decide to use a citation manager even if it is not recommended by a publisher. Advantages of citation managers include: automatic generation of bibliography, easy reference organization, unified changes of referenced sources and of citation style. Most of all, mistakes are easier to spot and fix when using a citation manager.
Zotero
The citation manager currently supported by our software is Zotero. Zotero allows researchers to save references from library catalogs, research databases and other websites with a single click (Puckett 2017). Using Zotero, you can simply add, update and manage all citations in your work. A Zotero citation can look like that:
A claim (see Fickers and Tatarinov 2022, vol. 2, chap. 1 for more examples).
Note that with Zotero, you manage the contents of the source centrally within your Zotero application. In your book or other literary work, you can add a reference to that source and optionally you can also add a prefix or a suffix or a page/chapter/figure/etc. you want to cite. Thus, Zotero is the only source of truth regarding the quoted source and your current work is the only source of truth regarding the individual reference to the source.
Installation of Zotero
To install Zotero, please follow the instructions from the official Zotero documentation.
Installation of Zotero Word Plugin
Make sure that you have the Zotero Word Plugin installed by following the instructions in the documentation. If you were able to install the plugin successfully, you should be able to see the Zotero tab in your MS Word program.
Figure 2.13: Zotero plugin installed in MS Word.

How To Add/Edit A Citation
Please follow the Zotero plugin instructions on how to add and/or edit your citations.
You can begin citing with Zotero by clicking the “Add/Edit Citation” button. Pressing the button brings up the citation dialog. The citation dialog is used to select items from your Zotero library, and create a citation. Start typing part of a title, the last names of one or more authors, and/or a year in the dialog box. Matching items will instantly appear below the dialog box.
How To Check If Your Citation Is Valid
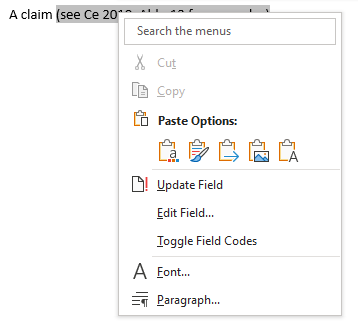
A valid citation should be an active field, which can be updated, edited and to which you can toggle field codes to see their internals (see Figure 2.14). Do not use those options for editing – for that purpose use the “Add/Edit Citation” button on the top left corner of the MS Word “Zotero” tab. Please do not, under any circumstances, unlink your Zotero citations as this will irreversibly break them.
Figure 2.14: A valid Zotero citation should be an active field. After right-clicking it you should see options like “Toggle Field Codes” (this option will allow you to see the internal data of your citation).
Document Preferences
You can always change options of your citations by setting the Document Preferences. In particular, you can change the citation style, language, whether the citations are displayed as footnotes or endnotes, etc. Please set your Zotero style to Chicago Manual of Style (17th edition, author-date style).
By default, your citation will be rendered how you, the author, added it. Please note however that your document preferences might be overwritten by the platform. For example, a different citation style may be chosen by the publisher.
Bibliography
If you have been using Zotero, please do not add a bibliography manually. In that case the bibliography will be automatically generated for you. Creating a bibliography on your own will duplicate an already existing one. If on the other hand you are not using Zotero, you will need to add your own bibliography.
If you haven’t been using Zotero, you need to add the bibliography manually.
Bibliography
Puckett, J., 2017. Zotero: A Guide For Librarians, Researchers, and Educators 2nd edition., Assoc of College & Research Libraries.
Fickers, A. & Tatarinov, J. eds., 2022. Digital History and Hermeneutics first edition. A. Fickers & J. Tatarinov, eds., De Gruyter Oldenbourg. Available at: doi:10.1515/9783110723991.